
Way back when living in an old farmhouse was still a dream, I toured the home and gardens of Bunny Williams in Connecticut. She’s an accomplished and downright amazing interior designer and entrepreneur, and her property was then, and still is magnificent. I was in awe, taking notes with my eyes and doing my best to file all of my favorite details in my head. Now, if smart phones had been around, then my note-taking would have been so much easier.
Her large greenhouse was glorious to see, and every garden (she has several) was meticulously manicured, and dotted with boxwood shrubs. In fact, boxwoods seemed to be her plant of choice because they were displayed everywhere: all planted in groupings, some in pots, some in the ground, and many in large antique urns that almost made me drool. All were sheared into dome and sphere shapes and all looked so lush and green.
From here on, I was hooked on growing boxwood bushes here at the 1820.
You Can Tour Bunny Williams’ Home And Gardens Too!
Bunny published a lovely book of her beautiful home and gardens. Inside, there’s gorgeous images of inside her home and of all of her gardens, the green house, her chicken coop and a pool house that is a feast for your eyes!


Boxwood Care For Winter Months

Though it wasn’t in our budget to buy the quantity of boxwoods I would like, every year, I buy a few to add to our gardens. Slowly but surely, our healthy boxwood collection is growing, and every year when late fall rolls around and the frost lingers, I prep all of our plants for winter following these proper care tips.
There are several different boxwood varieties, from those that prefer partial shade to those that thrive in full sun. They’re relatively low maintenance and in amazing news, boxwoods are deer resistant. To ensure that your boxwoods remain healthy plants for the following growing season, it’s a good idea to follow these steps at the end of the growing season, to prepare boxwoods for cold weather. Whether you have them planted in the ground, or in container gardens, these practices are valuable to prevent winter burn from the freezing temps and harsh winter sun.
Preparing boxwood plants for cold winter is essential to help them survive cold temperatures and adverse weather conditions. Time to prepare boxwoods for winter. For the best results, here are five best ways to prep your boxwood plants for winter and to keep them healthy for the following year:
5 Best Tips How To Prepare Boxwood Plants For Winter

Depending on where you live, most of the areas in the country have had their last days of extended heat. Cool days and cold nights have set in, so now is the best time to prep boxwood and boxwood hedges for winter.
- Watering:
- The frequency of freezing temps at night have become the norm, so start the process of watering less frequently. The last watering of the season should be right around now, so to encourage deep root growth and resilience against drought and winter stress.
- Also, by reducing watering now will avoid waterlogged soil, which can lead to root rot in colder temperatures. The water will freeze in the soil and around the roots, killing the plant.
- Mulching:
- Apply a 2-3 inch layer of organic mulch, such as shredded bark or compost, around the base of your boxwoods. Mulch helps retain soil moisture, regulates temperature fluctuations, and a layer of mulch provides insulation against freezing temperatures. Mulch around the base of the plant also allows for good drainage for an evergreen shrub, such as boxwoods.
- Be sure not to mound mulch against the base of the plant, as this can create a favorable environment for pests and fungal disease.
- Pruning:
- Prune your boxwoods lightly in late summer or early fall to shape them in your desired shape, and remove dead or diseased branches. Keep it at a minimal pruning in the fall, and avoid heavy pruning in the late fall or winter, as this can stimulate new growth that may be susceptible to frost damage.
- Anti-Desiccant Spray:
- Apply an anti-desiccant spray to the foliage of your boxwoods in late fall. This helps reduce moisture loss through the leaves, which can occur on sunny winter days when the ground is frozen.
- Follow the manufacturer’s instructions for application and reapply if necessary.
- Wrapping or Shelters:
- In regions with extremely cold temperatures or heavy snowfall, consider providing additional protection for your boxwoods. You can wrap the plants in burlap or use wooden A-frame shelters to shield them from harsh winter winds and heavy snow loads.
- Ensure that any wrapping or shelters are well-ventilated to prevent moisture buildup and fungal issues.
Why Boxwood Plants Should Be Wrapped With Burlap?
In northern cold climates to prevent boxwood winter damage, it’s always best to wrap boxwood plants with a material that provides good air circulation such as burlap. Burlap protects boxwood foliage from freezing during those harsh winters, where this special attention is needed. Also, this protection will promote healthy growth come early spring.
The Best Way How To Wrap All Varieties Of Boxwood Plants With Burlap
Here Are All Of The Materials You Will Need:
Prepare Boxwood For Winter
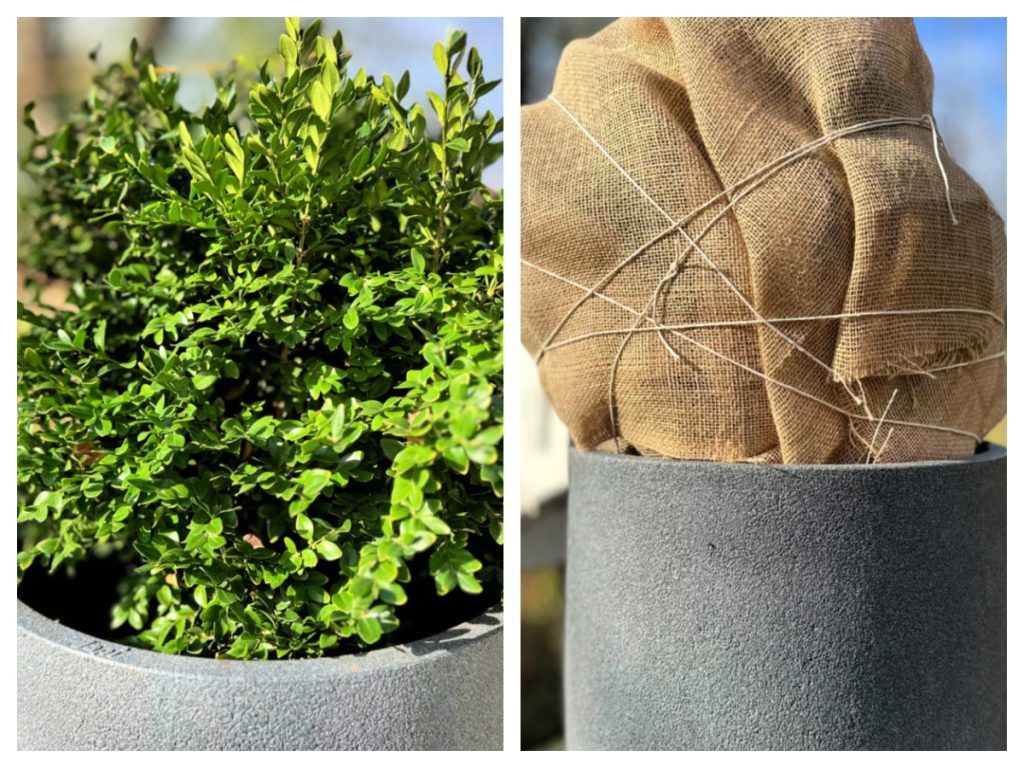
Step 1. The first step is to wrap burlap around the boxwood in a single layer. One person holds the end of the burlap in place while another wraps. Arrange the branches inside so they bend upward, as downward-bending branches are more likely to break.
Step 2. Wind a length of twine around the boxwood near the bottom of the burlap-covered area. Tie the twine together to hold it in place. Continue wrapping the twine until you reach the top of the burlap, then tie the end of the twine. Wrap the boxwood tight enough so the burlap stays in place, but not so tightly that the twine forces the branches out of shape.

Step 3. Remove the burlap in late winter after most danger of hard frost is past and before the boxwood begins putting on new growth. Overheating occurs if the burlap is left on the shrubs for too long after temperatures begin to warm.
In addition to these preparations, monitor your boxwoods throughout the winter for signs of stress, such as leaf discoloration or damage. Be prepared to provide additional water during dry, mild spells when the ground is not frozen.
Remember that the specific winter care requirements for boxwoods may vary depending on your climate and USDA zones, and the variety of boxwood you have. Consult with a local garden center or gardening expert for advice tailored to your region and plant variety.
Can Boxwoods Grow From Cuttings And When Is The Best Time?

Yes, boxwoods can be propagated from cuttings. Here’s a basic guide on how you can do it and the supplies you will need.
- Selecting Cuttings:
- Choose healthy, disease-free stems for your stem cuttings. Ideally, select semi-hardwood or hardwood cuttings, as they tend to root more successfully.
- Cuttings are often taken in late summer to early fall, and not in the cold winter months. This is when the plant is slowing down its growth, and the stems are not too tender.
- Preparing Cuttings:
- With gardening clippers or a sharp knife, cut stems that are around 4 to 6 inches in length, and make the cut just below a leaf node. Remove any flowers or buds from the cutting.
- If the leaves on the lower part of the cutting are large, you can trim them to reduce water loss through transpiration.
- Rooting Hormone:
- Dip the cut end of the stem into a rooting hormone. This helps stimulate root development.
- Planting:
- Plant the cutting in a well-draining rooting medium, such as a mix of perlite and peat moss. Make a hole in the medium with a pencil or similar tool and insert the cutting.
- Caring for Cuttings:
- Keep the cuttings in a humid environment. You can cover them with a plastic bag or place them in a propagation tray with a clear lid.
- Maintain consistent moisture, but avoid waterlogged conditions, as this can lead to rot.
- Rooting Time:
- It may take several weeks to a few months for the cuttings to develop roots. You can gently tug on the cuttings to check for resistance, which indicates the development of roots.
- Transplanting:
- Once the cuttings have rooted, you can transplant them into individual pots or directly into the garden.
Remember that not all cuttings will successfully root, so it’s a good idea to take more cuttings than you need. Also, patience is key, as rooting times can vary. Providing the right environmental conditions and care will improve your chances of success.


